Custom pet portraits, hand made cake toppers

Showing posts with label DIY Christmas. Show all posts

Monday, December 23, 2013

DIY place holders for the Christmas table

C

hristmas is almost here, only two days!


I'm making some decorations for the table, I want to show you these very cute trees I will use as place holders, I made them with pine cones, empty rolls of tape and recycled pieces of different ribbons.


First of all I attached the ribbons to the empty rolls of tape with hot glue, I used some little pieces of different ribbons I kept in a drawer because I knew that one day I would have used them :)
The rolls will be the vases for the trees.


I painted the pine cones with green acrylic color and I glued them to the empty rolls


I added the magic of winter with some snow crystal and glitter!
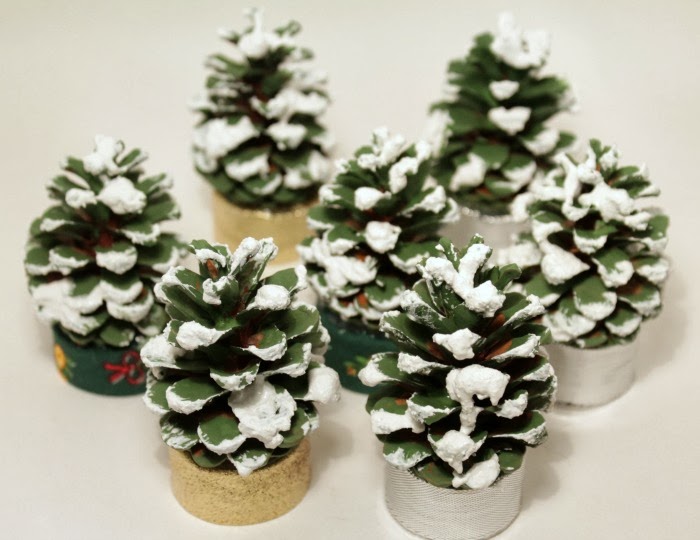

They are already very cute but we can add also something on the top, for example a glass bead


...and finally a little piece of cardboard with the name!


Have you already thought how to decorate your Christmas table?


Tuesday, December 17, 2013

Wrapping time! DIY cute packaging ideas for the holidays

A

lso this year my holidays season has been very busy, I worked day and night to create all the ornaments and to paint all the portraits in time for Christmas.

The best part of the holidays is to make the gifts for all the people we love, isn't it?
So I'm very happy to have helped all my wonderful customers around the world to create unique and personalized gifts for their families and friends, original artworks made with love, that they will cherish in the years to come.

Now it's the time for me to prepare the gifts for my family and friends, I want to wrap each one with a package suited to the personality of the person who will receive it.

These are two example of wrapping I want to share with you, country, simple and a bit romantic.


 WHAT I USED
-wrapping paper
-pink cardboard (or the color you prefer)
-stapler
-scissors
-double-sided tape


"ACCORDION BOW"
I cut tree stripes, one larger from the wrapping paper and two narrow from the pink cardboard, approx. 20" long, width as you like.
I fixed the two pink stripes on the two sides of the wrapping paper stripe with the stapler, only from one end of the stripe.
I rolled the three strips together.


I folded the stripe like an accordion, increasing the size, I fixed the bow with the stapler


I cute other two pink stripes to complete the package, I fixed everything with double sided adhesive


"CUTE PINK BOW"

Another idea is to make a very simple pink bow, really cute!


Happy wrapping! :)


Sunday, December 23, 2012

DIY: Creative Christmas cupcakes!

T

 oday I made some cupcakes for the Christmas Eve dinner with my family and kin.
It has become a tradition that every year I create new desserts to amaze them, this year I tried to make some cupcakes, it's the first time for me and I'd like to show you the final result and the recipe I used.
I made vanilla cupcakes, here are the decorations I created:

   
Merry Christmas!!!

WHAT I USED:

For 12 vanilla cupcakes
- 4,5 oz. Butter
- 4,5 oz. Sugar
- 3 Eggs
- 4,5 oz. Flour
- 1 teaspoon baking powder
- 2 spoons milk
- 1 teaspoon vanilla

For frosting:
- 2,7 oz. Butter
- 2 spoons milk
- 1 teaspoon vanilla
- 8 oz. powdered sugar

For decorations:
- White fondant
- Food dyes
- Red glitter for food
- Candied cherries

Step1: Cupcakes
First of all heat the oven to 374 F(190 ° C)
In a bowl combine the butter and the sugar, whisk until well blended


 Whisk the eggs


Add slowly the aggs to the butter together with a spoon of flour and whisk


Add the milk and all the flour and whisk until completely incorporated into the butter mixture


Now you can pour the batter in the baking cups


Bake for 15 to 20 minutes.

Here is my first cupcake ready to be decorated!


Step2: Frosting

In a bowl whisk the butter with the milk and add the powder sugar. Whisk to combine.
Cover the cupcakes with the frosting:


You can add food dyes to color the frosting, I left it white because I want some snow for Christmas!

Step3: Decorations!

I made polar bears with white fondant, here are the elements for the bodies:


Then I made penguins:


I hope my guests will like the cupcakes!


Polar bear Christmas cupcake


Polar bear cupcake with stars and cherries


Penguin Christmas cupcake


A more simple cupcake with a star decorated with red glitters:


Star cupcake with cherries
A total white cupcake covered with fondant with a simple white rose

White rose cupcake

Happy Holidays to everyone!!


Saturday, December 22, 2012

Christmas tree card tutorial with ornaments and gifts!

T

 oday I wrapped the last gifts, now everything is ready under my Christmas tree, there is a really good atmosphere and Christmas is very close.
I am very proud and honored for all the pet portraits I painted, they are gifts that will be opened this Christmas all over the world, I've done my best to paint everything in time, it was a really crazy period for me (I painted also at night!) but it's my favourite period of the year, I love my work so much!! Thanks from the bottom of my heart to all my wonderful customers!!

I'd like to share with you another Christmas card I created for one of my best friend, it's quite simple to make but is really cute and can be personalized in the way you prefer. 


FOR THIS PROJECT YOU NEED:
-light purple cardboard
-green cardboard
-brown paper ( I recycled a piece of brown wrapping)
-colored cardboards and ribbon as you prefer for the tree ornaments and the gifts (you can also use pieces of wrapping paper of your gifts)
-pencil
-scissors
-glue

1-Cut a rectangle 8,3"x11,6" from the purple cardboard and fold it in the middle


2-Fold the card in horizontal as in the image, 5,2" from the border


3-Draw the shape of an half Christmas tree as in the image:


4-Cut the tree shape:


5-Fold following the dotted line:


6-Fold downwards following the dotted line:


7- Open the card and bend the shape of the tree towards the inside:


8-Cut a tree shape from the green cardboard:


 and stick it on the purple tree shape of the card:


9-Add the vase made with the brown paper:


Now the funniest part!! You can add all the decorations you prefer, free your imagination!


Tuesday, November 27, 2012

DIY: a cute Christmas card with polar bear!

I

 n these days I'm thinking about the Christmas gifts for my friends and I would like to create hand made special cards for them, I'm experimenting with the cardboard and I'd like to share my creations with you.
The first card I created has a cute polar bear dressed like Santa Claus that comes out of the card with a  three-dimensional effect.

Polar Bear Christmas greeting Card
You need:
- light blue, white and red cardboard
fine tip black marker
- double-sided adhesive tape
-scissors


Step 1:
-First of all cut a rectangle 12"x 4" from the light blue cardboard, it's the base of your card.
-Draw on the white cardboard with a fine tip black marker the polar bear's head and with a pencil all the white parts and the tree shape. 
You can use my drawings:


-Cut all the shapes
-On the red cardboard draw and cut all the shapes for bear's slevees, gloves, Santa hat and two stripes for the body:


  Step 2:
 -Stick the two stripes with double-sided adhesive tape as shown in the image below and fold stripe 1 on stripe2:

 
- Fold stripe 2 on stripe 1 and so on until the end of the stripes


Stick the bear's sleeves and gloves with the tape:


his head and Santa hat:


Step 3:
Now you have all the decorations for your Christmas card and you can stick everything on the light blue cardboard:


Do you like the polar bear that comes out of the card wishing you "Happy Holidays"? Send greetings in this way, with a thing hand made by us, is how to donate a bit of time, so precious, to someone special for us.